RULA method: what it is, how to apply it and a step-by-step example
The RULA method is very likely the one that prevention reports quote most. It is also one of the most misused. People apply it to dynamic tasks it cannot measure, they score it without a clear rule for picking postures, and they read the result as a final verdict, when its authors meant it only as a screening tool.
This guide explains what the RULA method is, how to apply it step by step and how to read its action levels. It also clears up something just as useful: when to set it aside and pick another method.
What the RULA method is and what it assesses
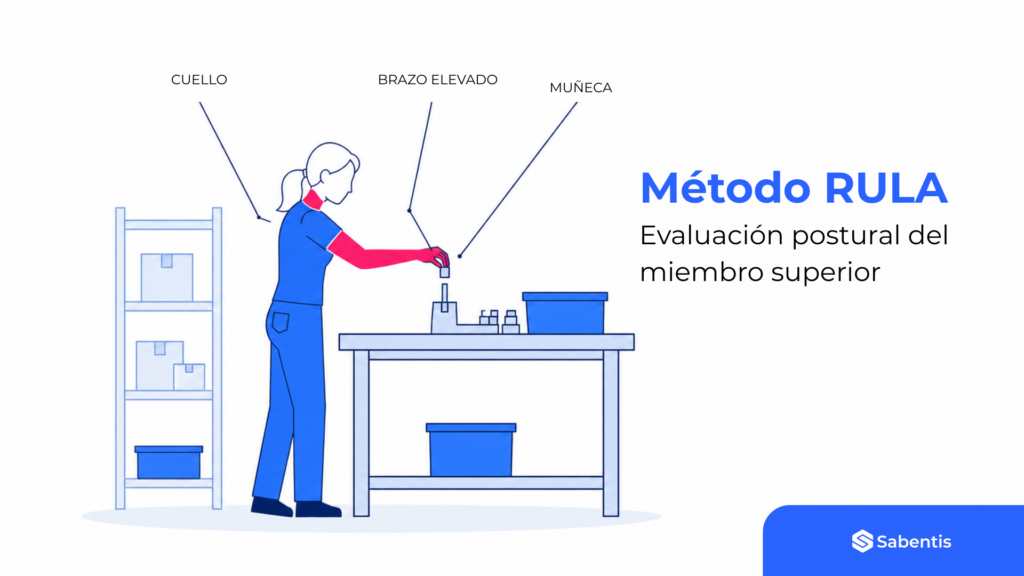
RULA (Rapid Upper Limb Assessment) is an observation method that measures postural load. Lynn McAtamney and E. Nigel Corlett, from the University of Nottingham, created it and published it in Applied Ergonomics in 1993. It rates the exposure of the arm, the forearm and the wrist, together with the neck, the trunk and the legs. It also weighs muscle activity, whether static or repeated, and the force applied.
The result is a score from 1 to 7 that maps onto four action levels, from an acceptable posture up to an immediate change. It is quick and it needs no equipment. That is why the RULA method has become one of the two most used postural scoring tools in the field, next to the REBA method.
When to use the RULA method and when not to
The RULA method fits when the risk sits in the upper limb and the task stays anchored to a fixed point: bench assembly, screen work, sewing, in-line inspection or laboratory work. In short, static or seated tasks in which the body barely leaves the spot.
By contrast, it is not the right choice if the task moves the whole body, if postures turn unstable or if the worker handles heavy loads. Those cases call for REBA. It also falls short when the leading factor is lifting, which calls for the NIOSH equation, or high frequency repetition, which calls for OCRA.
There is one more limit worth keeping in mind: RULA does not assess sequences. It scores single postures, so the assessor has to pick the worst ones or the ones that last longest inside the cycle.
How to apply the RULA method step by step
- Watch the task and pick the postures. First you watch the task over several cycles. Then you pick the postures that load the body most or that last longest. Where it applies, you assess both sides of the body.
- Score Group A, that is, arm, forearm and wrist. You score the arm angle, with corrections if the shoulder is raised, if there is abduction or if there is support. Then you score the forearm and the wrist, with their sideways deviation and their twist.
- Score Group B, that is, neck, trunk and legs. You repeat the process with the neck and trunk angles, with corrections for twist or side bending, and with the support of the legs.
- Add muscle activity and force. Each group adds one point if the posture is held for more than a minute or if it repeats more than four times a minute. You then add the load score.
- Get the final score. The two scores cross in the tables of the original method, and that is how the final value comes out, from 1 to 7, with its action level.
The whole weight of the RULA method sits in two moves: watch well and choose well. If the assessor skips part of the cycle, the resulting mark is worth nothing. And if they pick the easy posture instead of the worst one, the real risk never reaches the report. So take notes and, where you can, record a short video of the task.
Action levels: how to read the final score
| Final score | Action level | Reading |
|---|---|---|
| 1-2 | Level 1 | Posture acceptable if it is not held or repeated over long periods |
| 3-4 | Level 2 | Changes may be needed; a deeper look helps |
| 5-6 | Level 3 | The task design needs changes in the short term |
| 7 | Level 4 | Changes are needed right away |
The action level marks the urgency, although it does not close the diagnosis. In fact, the authors themselves put the RULA method forward as a screening tool that sometimes asks for a deeper study.
Practical example: a bench assembly workstation
Picture an assembly operator who stands at a bench. Her right arm rises about 50 degrees with no support, the forearm sits in mid range and the wrist bends with a sideways deviation. Meanwhile the neck leans about 15 degrees towards the part, the trunk stays straight and the legs rest well. Posture barely changes and the load stays under 2 kg.
When you apply the bands of the RULA method, the arm at 50 degrees with no support raises its score and the wrist adds points for the deviation. Both groups also add the static activity point. The crossing in the tables places the case in the 5-6 band, that is, action level 3 and changes in the short term.
Here the strongest measure is design and not training: raising the part or tilting the work surface cuts the bend of the arm and the neck. After that, run the assessment again. The exact values must always come from the tables of the original method.
Limitations of the RULA method
The RULA method is not exhaustive. It rates single postures, it barely penalises the load, because the load only acts as a modifier, and it treats the legs in a very simple way. Its reliability also depends on how the observer estimates the angles.
That gap between observers shows up in every observation method, so assisted measurement keeps gaining ground. The ergonomics section of Prevencion Integral follows the technical debate on this point.
RULA method or REBA: a decision table
| Feature of the task | Recommended method |
|---|---|
| Task anchored to a bench, a desk or a screen | RULA |
| Risk concentrated in the upper limb | RULA |
| Whole body on the move | REBA |
| Unstable or shifting postures | REBA |
| Handling of loads or of people | REBA or a specific load handling method |
| Grip has to be rated | REBA |
The full comparison between the two, next to the rest of the tools in the field, sits in our guide to ergonomic assessment methods.
How to automate the RULA method with video
Estimating angles by eye is the most fragile part of the process, and today you can automate it. Computer vision systems read the postures from a video shot on a phone and work out the score with the same rule every time. Assessment time drops, and so does the gap in criteria between technicians.
At Sabentis this approach sits in the Ergonomics module through AI posture analysis, with the RULA method among the ones it supports. The International ORP Foundation also shares these advances in its congresses and publications.
Frequently asked questions
Does the RULA method work for dynamic postures?
No. RULA rates single postures picked from the work cycle. If the task is dynamic, unstable or involves walking, the right choice is REBA.
Which RULA score counts as acceptable?
A final score of 1 or 2, that is, action level 1. Even so, the posture should not be held or repeated over long periods.
Does the RULA method assess manual handling of loads?
Only in part, because the load acts as a modifier of the score. If lifting leads the risk, you have to apply the NIOSH equation or the INSST Technical Guide.
How many postures should you assess?
As many as the cycle needs. At the very least, the worst posture and the one that lasts longest. If the two sides of the body work in different ways, assess both.
From screening to risk management
Do you want to see how the RULA method works on a real video of your workstation, with the score worked out on its own? Request a Sabentis demo and we will go through your own case.
Want to apply the RULA method without spreadsheets?
With Sabentis you log the postures, get the RULA score and build the report inside the same workflow.
Request your demoA guided 30 minute demo. No strings attached.